My husband and I were newly weds when we purchased our first home a quaint little ranch with a lot of old charm nestled in the beautiful State of Maine. This house was in dire need of some TLC and we were the couple to do it. We both were newbies when it came to home improvement, but we would work hard and figure it all out along the way.
One of our biggest projects was our roof. The roof was old and the previous owners layered shingle after shingle on top of one another. I hired a teenage boy across the street to help me clean off the grayish green shingles because rain was forecasted later in the week. The boy and I worked hard and by evening the roof was clean and ready for its new roof.
My husband got home from work late and with the sun setting it was too late to start a roofing project. Sleeping soundly in our beds I awoke to the sound of rain, not gentle sprinkles, but a downpour. Panicked we ran into our dinning room to see water pouring in over our dinning room table and also in the middle of our kitchen. I grabbed every towel , bowl, and pot we had to catch the water from hitting the newly installed wood floors. My husband grabbed tarps and threw them up in the attic to catch the water. I got on the phone and dialed my parents hysterically crying and asking them for prayer. It was pouring rain and our home had no protection.
I ran to our neighbors house banging on their door at 3:30 in the morning asking for tarps, plastic, anything I could think of that might save the inside of my house. At 6:00 am Michael ran to our local Walmart and bought rolls and rolls of plastic sheeting. By 7:30 in the morning our house was completely covered in plastic, insulation was wet, and we both looked like a pair of drowned rats. It was a stressful night, but my husband and I learned a big lesson. Do not leave a roof bare even if no rain is in the forecast because Mother Nature can teach you a lesson. Thankfully, our quick thinking and ingenuity with tarps and pots in the attic we had minimal damage to our darling little home.
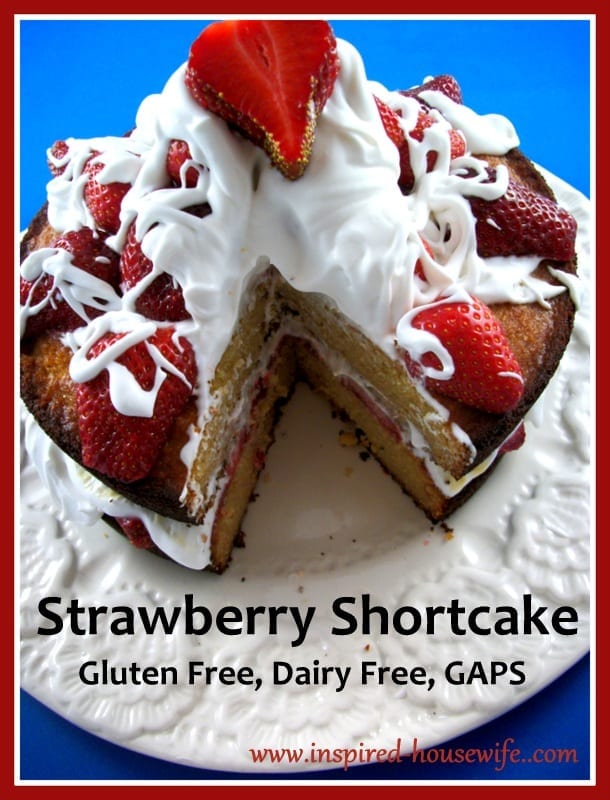
Gluten and Dairy Free Strawberry Shortcake (can also be GAPS free)
Strawberry short cake is one of my favorite desserts, but when we went gluten free I could never find a recipe quite as good as the gluten shortcake my mom made me as a kid. A few weeks ago I made some amazing gluten free carrot cupcakes by Nourished Kitchen. The cupcakes were so yummy my family ate them all in a matter of days. The recipe used coconut flour and oil, giving them a nice coconut flavor and they were not overly sweet. Jenny said she had never made a cake recipe out of it, but I figured with a little tweaking I could probably modify her recipe to make a perfect gluten free shortcake.
I cut the honey down by half, cut out the carrots, and did a different topping. I made the cake twice because it cooked faster than I anticipated and the first two cakes got really dark, almost burnt. The second batch turned out beautifully and the taste is a perfect mixture of fluffy, moist, and sweet.
Ingredients:
1/2 Cup of coconut flour
2 Cups of almond flour
1/2 tsp of sea salt
1 1/4 tsp of baking powder. (leave this out to be grain free the cakes will not rise as much)
1 tsp of baking soda
4 large eggs
1 Cup coconut oil
1/2 Cups of honey
1/2 Cups of plain Greek yogurt or use Coconut Yogurt to be Dairy Free
2 9 inch round cake pans
Instructions:
- Preheat your oven to 375 degrees and move a rack to the middle of the oven for even cooking.
- Use two 9 inch round cake pans or a sheet cake pan make sure to grease or spay them to ensure batter does not stick to the pan.
- Take your dry ingredients coconut and almond flour, sea salt, baking power (omit if grain free), and baking soda. Mix these ingredients up until they are well mixed.
- In another bowl mix your eggs, honey, and yogurt until thoroughly mixed together.
- Add your dry ingredients a little bit at a time to your wet ingredients and mix until mixture is smooth. You do not want to mix too much as I think it affects the rising of the cakes.
- Cook for 15-18 minutes, but watch the cakes as a couple minutes can make a huge difference in the color
** If you need a dairy free whipped cream option I use a can of coconut milk. Put your can of coconut milk in the refrigerator for a couple of hours to chill. Once your can of coconut milk is chilled open it and dump the coconut milk into a bowl. The topping for this recipe I added in a 1/4 cup of honey to the coconut milk and whipped it by hand until it looked like whipped cream. It is simple and better tasting than the dairy whipped cream counter parts.
XOXO,
Amee
If you enjoyed this post please share it with your friends on Pinterest by clicking the “Pin it” button below or “share” it on Facebook.
Shared on these wonderful linking parties:


